


Welcome to this week's exploration where we delve into the transformative power of JSDoc in enhancing your JavaScript projects. In this guide, I aim to provide you with a clear understanding of JSDoc's capabilities and its impact on your codebase.
What is JSDoc? 📝
JSDoc is an API documentation generator for JavaScript, designed to make your code editor exceptionally intelligent 💪🏼. In the following sections, we'll dive into the 'how' behind this intelligence.
Why You Should Use JSDoc 🤔
When TypeScript is Not an Option: If you can't or don't want to use TypeScript in your project.
Legacy Codebases: Dealing with legacy codebases that aren't compatible with TypeScript but still aiming to leverage its benefits.
Effective Code Documentation: JSDoc allows you to document your code effectively, providing clarity and understanding.
Type Information for Editors: JSDoc annotations offer type information, enabling modern code editors to provide superior autocompletion, type checking, and error highlighting.
ESLint Integration: Leverage JSDoc comments for additional checks and to enforce coding standards.
Still not convinced? Imagine one typo causing a production error; JSDoc can be your safety net.
In-Built Types in JavaScript 🛠️
1. How JSDocs Work
The /** ... */ syntax in JavaScript is specifically used for creating JSDoc comments. These comments serve the purpose of documenting your code. Unlike regular comments (/* ... */), JSDoc comments are structured, providing a standardized way to convey information about the code's functionality, types, parameters, return values, and more.
Basic Comments
/**
 * This is a basic JSDoc comment.
 */
function myFunction() {
  // Function implementation
}
2. Function Documentation:
/**
 * This function adds two numbers.
 * @param {number} a - The first number.
 * @param {number} b - The second number.
 * @returns {number} - The sum of the two numbers.
 */
function addNumbers(a, b) {
  return a + b;
}
@param: Describes a function parameter. It specifies the name, type, and description of the parameter.@returns: Describes the return value of the function. It specifies the type and provides a description.
3. Variable Documentation:
/**
 * @type {string}
 * @description This variable stores the current user's name.
 */
const userName = 'John';

/** @type {number} */
const amount = 100;

/**
 * @type {boolean}
 */
let isLoggedIn = false;

/**
 * @type {(string|number)}
 * @description Either a string or a number.
 */
const mixedTypeVariable = 'Hello';

/**
 * @type {Date}
 * @description The current date and time.
 */
const currentDate = new Date();

/** @type {string | undefined} */
let unassigned;
unassigned = 'Josh Deo';

/** @type {null} */
const nul = null;

/** @type {undefined} */
const und = undefined;

/** @type {symbol} */
const sym = Symbol('foo');

/** @type {*} */
const jsDocAny = 'any value';

/** @type {any} */
const tsAny = 'any value';
@type: Specifies the type of a variable.@description: Provides additional information or a description of the variable.
This are basic primitive types only when working with code we need more advance types like array, object, enum, etc
4. Type Information
- Object
/**
 * Represents a user in the system.
 * @typedef {Object} User
 * @property {string} username - The username of the user.
 * @property {string} email - The email address of the user.
 * @property {number} age - The age of the user.
 * @property {Gender} gender - The gender of the user.
 * @property {Array<string>} interests - An array of user interests.
 * @property {Object} address - The user's address.
 * @property {string} address.city - The city of residence.
 * @property {string} address.country - The country of residence.
 */

/**
 * @type {User}
 * @description The currently logged-in user.
 */
let currentUser;
@typedef: Defines a custom type, in this case, an object type named "User."@property: Describes the properties of the custom type, including their names, types, and descriptions. When you hover User type you can see whole info in VScode.Array
/**
* @type {string[]}
* @description An array of color names.
*/
const colorNames = ['red', 'green', 'blue'];
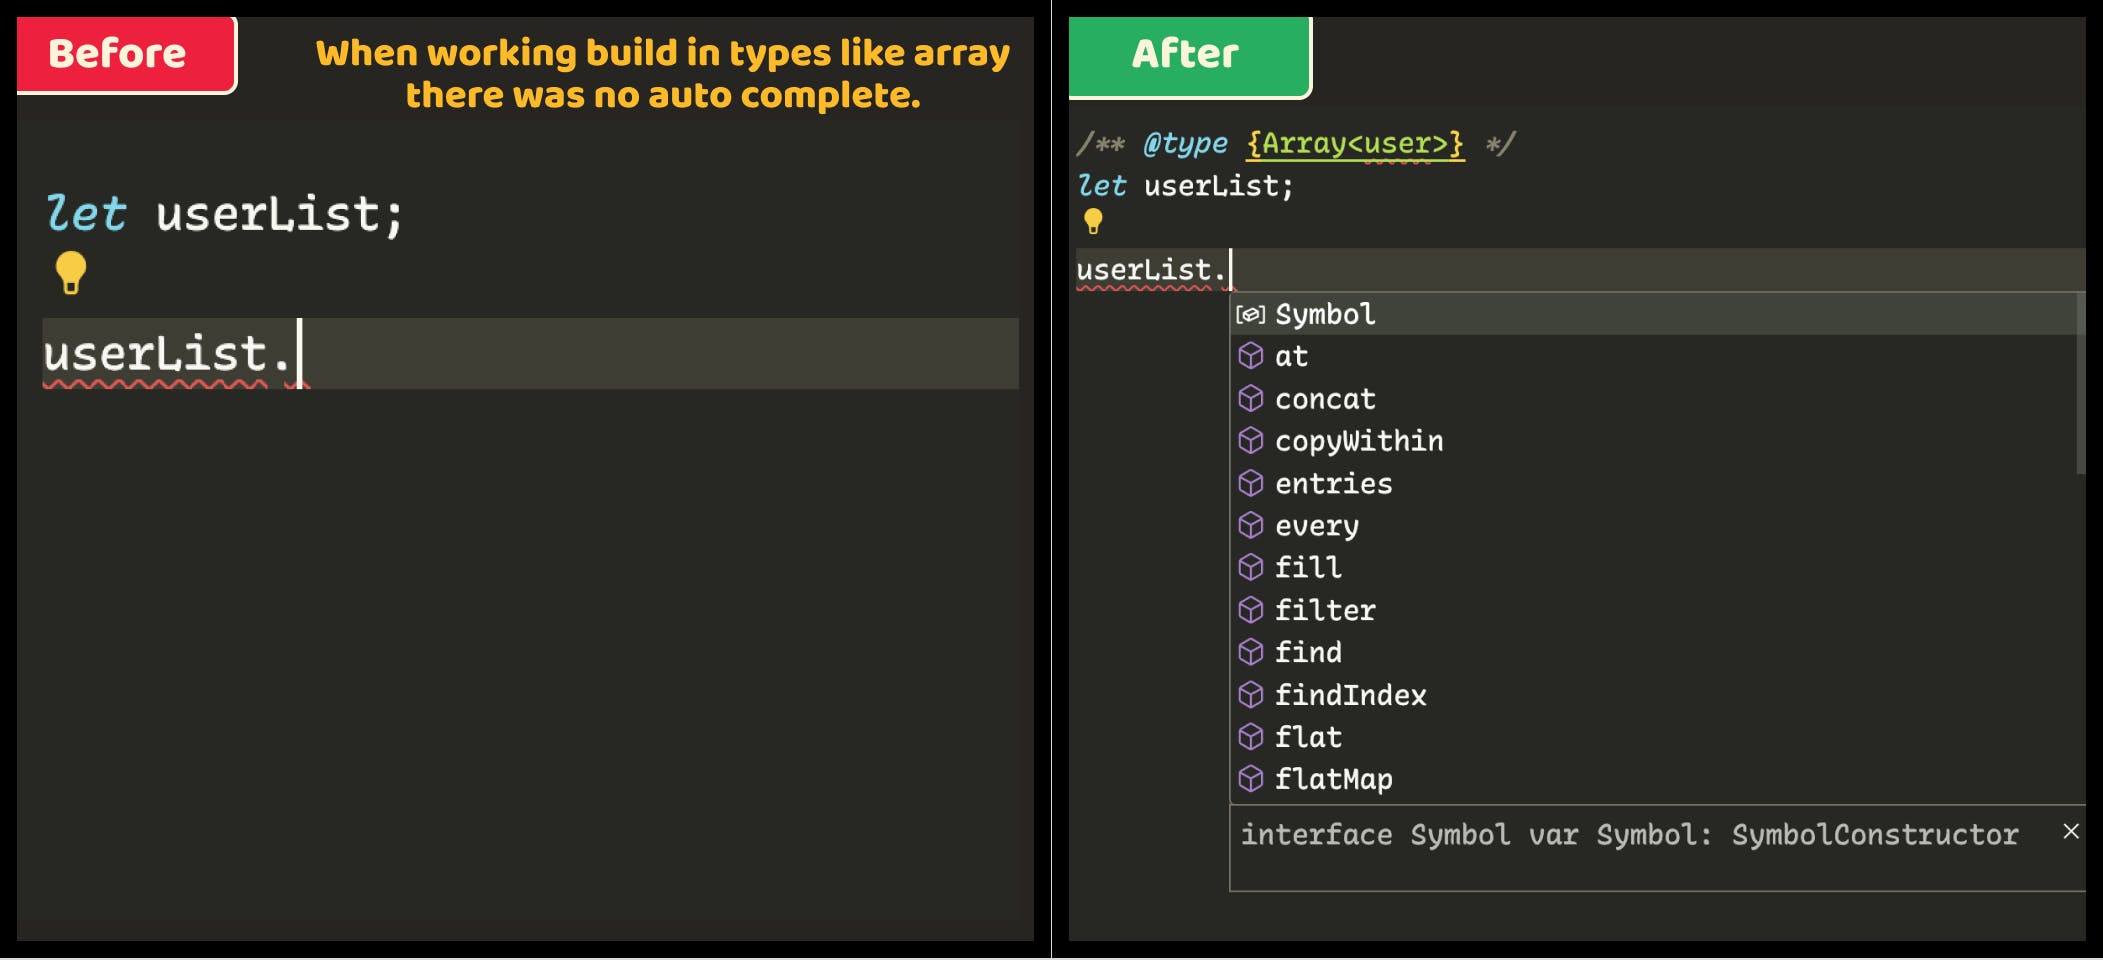
/**
* @type {Array<User>}
* @description An array of user objects.
*/
const userList = [
{
name: 'Alice',
age: 30,
gender: "male",
interests: ['reading'],
address: { city: 'CityA', country: 'CountryA' }
},
{
name: 'Bob',
age: 25,
gender: "female",
interests: ['gaming'],
address: { city: 'CityB', country: 'CountryB' }
},
];
- Enum
/**
 * @enum {string}
 */
const Gender = {
  MALE: 'male',
  FEMALE: 'female',
  OTHER: 'other',
};
Note that @enum is quite different from, and much simpler than, TypeScript’s enum. However, unlike TypeScript’s enums, @enum can have any type
- Optional parameter
/**
 * Creates a personalized message.
 *
 * @param {string} name - The name of the person.
 * @param {number} [age] - An optional age parameter (without default value).
 * @param {string} [greeting='Hello'] - An optional greeting (with a default value of 'Hello').
 * @returns {string} - The personalized message.
 */
function createMessage(name, age, greeting = 'Hello') {
  let message = `${greeting}, ${name}!`;

  if (age !== undefined) {
    message += ` You are ${age} years old.`;
  }

  return message;
}
- Rest parameter
/**
 * Represents a student.
 * @typedef {Object} Student
 * @property {string} name - The name of the student.
 * @property {...string} subjects - subjects the student is enrolled in.
 */

/**
 * Adds subjects to a student's record.
 *
 * @param {Student} student - The student object.
 * @param {...string} newSubjects - subjects to be added to the student's record.
 * @returns {Student} - The updated student object.
 */
function addSubjectsToStudent(student, ...newSubjects) {
  return {
    ...student,
    subjects: [...student.subjects, ...newSubjects],
  };
}
How to use with VSCode 🚀
Till now if you add JSDoc to your code it will give you Hover Preview and Signature help when working.
IntelliSense shows you intelligent code completion, hover information, and signature information so that you can write code more quickly and correctly.
Generate JSDOC: Quickly create JSDoc comments for functions by typing /** before the function declaration, and select the JSDoc comment snippet suggestion:

Auto complete code : Type based auto complete
Hover Preview : Hover over a JavaScript type or function to quickly see its type information and relevant documentation. The
⌘K+⌘Ikeyboard shortcut shows this hover information at the current cursor position.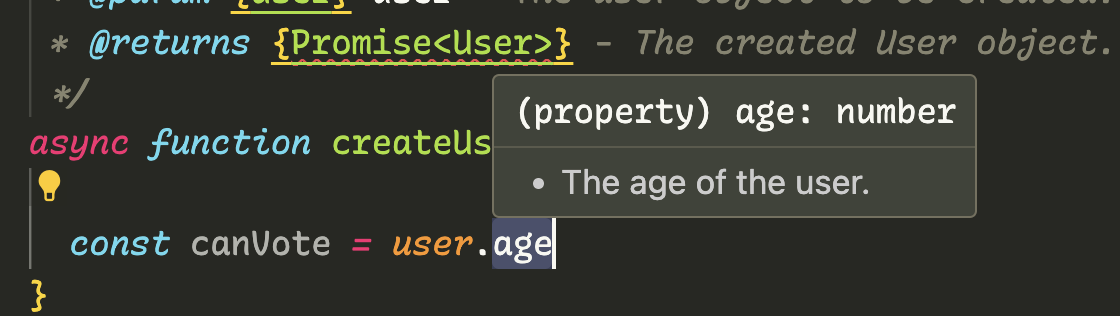
VSCode give you super cool features if you add JSDoc to your code. But till now it's not checking for errors
There are 2 way in which you work. Which depend on your usecase completly.
1. Using @ts-check
Not need to install anything or setting any config. Just add //@ts-check to top of file.

2. Using tsconfig.json or jsconfig.json
To enable type checking for JavaScript files that are part of a jsconfig.json or tsconfig.json, add "checkJs": true to the project's compiler options:
//jsconfig.json
{
  "compilerOptions": {
    "checkJs": true
  },
  "exclude": ["node_modules", "**/node_modules/*"]
}
//tsconfig.json
{
  "compilerOptions": {
    "allowJs": true,
    "checkJs": true
  },
  "exclude": ["node_modules", "**/node_modules/*"]
}
This enables type checking for all JavaScript files in the project. You can use // @ts-nocheck to disable type checking per file.
JavaScript type checking requires TypeScript 2.3. If you are unsure what version of TypeScript is currently active in your workspace, run the TypeScript: Select TypeScript Version command to check. You must have a .js/.ts file open in the editor to run this command. If you open a TypeScript file, the version appears in the lower right corner.
Working with Express API
Add Authoried user in middleware
Install express types
npm install --save-dev @types/expressDeclare AuthObject
/**
 * @typedef {Object} AuthenticatedUser
 * @property {string} user_id
 * @property {string} username
 */
- Adding user object in middleware function
//@ts-check

//Or
//To change express globally in app
declare global {
  namespace Express {
    interface Request {
      user?: AuthenticatedUser;
    }
  }
}
/**
 * @param {express.Request} req
 * @param {express.Response} res
 * @param {express.NextFunction} next
 */
function authenticate(req, res, next) {
  const { authorization } = req.headers;
  if (!authorization || authorization !== "Bearer your_access_token") {
    const errorResponse = {
      success: false,
      message: "Unauthorized. Provide a valid access token.",
    };
    return res.status(401).json(errorResponse);
  }

  req.user = { user_id: "123", username: "authenticated_user" };
  next();
}
Then add middleware to your express routes
// @ts-check
import express from "express";
import { authenticate } from "./middleware/auth";

const app = express();
const PORT = 3000;

// Apply the authentication middleware globally
app.use(authenticate);
- Api routes
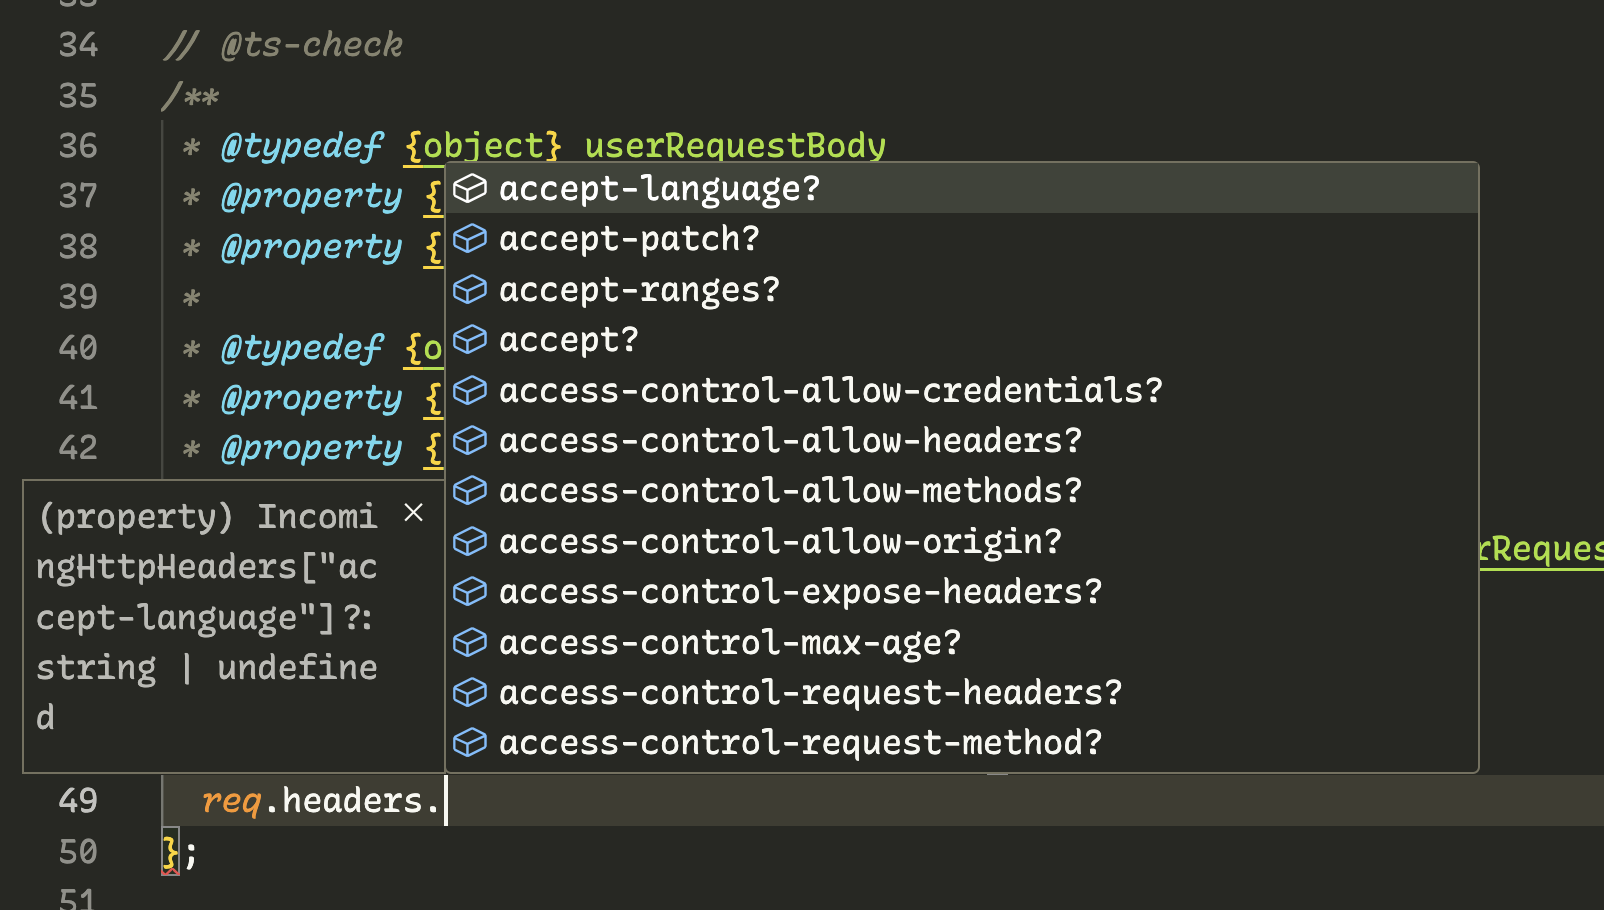
// @ts-check
/**
 * @typedef {object} userRequestBody
 * @property {string} name this is name in request body
 * @property {number} age this is age in request body
 *
 * @typedef {object} userRequestQuery
 * @property {string} name this is name in query
 * @property {number} age this is age in query
 *
 * @param {import('express').Request<{}, {}, userRequestBody, userRequestQuery>} req
 * @param {import('express').Response} res
 * @param {import('express').NextFunction} next
 */
exports.user = function(req, res, next) {

};
Request header
Request body
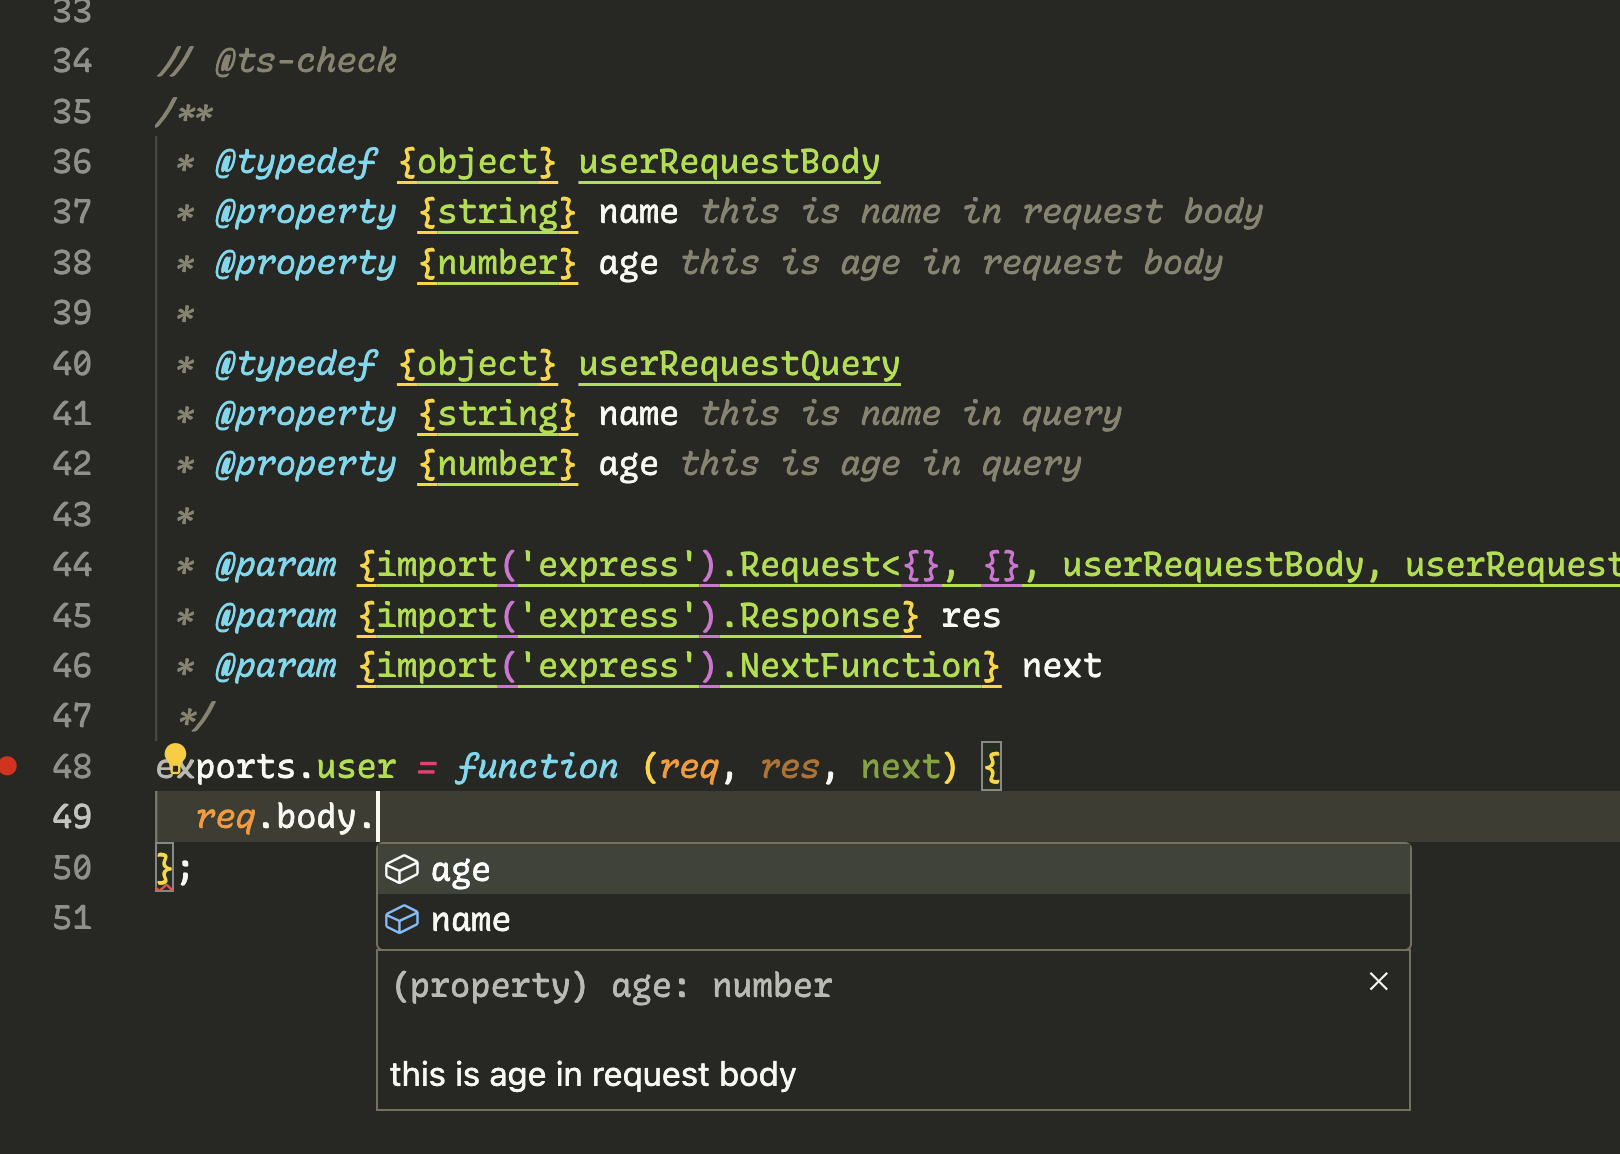
Request query

We don't always need type informantion on top of function. We can store it in user.d.ts file and import it also.
Tags for documentation
Tags that are mention above like @params, @return, @typedef, etc. are useful when working on project and documentation both. But there are some special tags that when used give more details if your focus is documentation also.
1. @example
Provides examples of how to use a particular function or piece of code.
/**
 * Calculates the sum of an array of numbers.
 *
 * @param {number[]} numbers - An array of numbers to sum.
 * @returns {number} - The sum of the numbers.
 *
 * @example
 * const result = calculateSum([1, 2, 3, 4, 5]);
 * console.log(result); // Output: 15
 */
function calculateSum(numbers) {
  return numbers.reduce((acc, num) => acc + num, 0);
}
2. @deprecated
Marks a function, variable, or class as deprecated, providing information about alternative methods.
/**
 * @deprecated Use newFunction() instead.
 */
function oldFunction() {
  // deprecated function implementation
}
3. @link
Creates a hyperlink to external documentation.
/**
 * See {@link https://example.com|Example Website} for more information.
 */
function myFunction() {
  // function implementation
}
4. @author
Specifies the author of a piece of code. This help other developer to know who is contact person.
/**
 * Calculates the sum of an array of numbers.
 *
 * @param {number[]} numbers - An array of numbers to sum.
 * @returns {number} - The sum of the numbers.
 *
 * @author John Doe
 */
function calculateSum(numbers) {
  return numbers.reduce((acc, num) => acc + num, 0);
}
5. @version
Specifies the version of your code or software. In large code base where they manage multiple projects it might useful.
/**
 * @version 1.2.3
 */
Bonus Tip
There are some advance usecase
1. Use @template for Generics
If you're writing generic functions, use @template to document the generic type parameters and their constraints.
/**
 * @template T
 * @param {T[]} array - An array of items of type T.
 * @returns {T} - The first item in the array.
 */
function getFirstItem(array) {
  return array[0];
}
2.Use @throws for Error Conditions
Document potential errors that a function may throw using @throws.
/**
 * @throws {Error} If the input is invalid.
 */
function processInput(input) {
  if (!isValid(input)) {
    throw new Error('Invalid input');
  }
  // ...
}
3. View live documentation
npm install --save-dev jsdoc
It will output in out folder.

Conclusion
In conclusion, adopting JSDoc in your JavaScript projects not only improves code documentation but also enhances the development experience by providing better tooling support. It's a valuable practice for maintaining clean and well-documented codebases.